From choosing the wire to finishing you necklace off, we're going to walk you through making your first necklace with Beadalon beading wire & crimps. Let's get started with some basic information! To complete this project, you'll need:
·Beading wire, Crimps, Beads, Crimping Pliers (optional - Regular pliers can suffice to get you started), Clasp
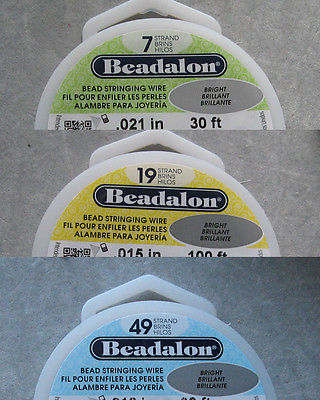
7, 19 or 49 Strand - What Does it Mean?
You have a few things to consider when choosing the right beading wire for any given beading project. Beadalon's nylon coated stainless steel wire is an industry standard for jewelry designers. The strandage number refers to the number of tiny wires that make up the stringing material. 7 strand has fewer tiny wires and is therefore less flexible and less strong. 19 strand is stronger and more flexible, while 49 strand offers premium flexibility and strength.
7 strand is great to learn on and costs less to boot. It is appropriate for many projects where you'll use quite a bit of wire -- we've seen it used for bunting and other craft projects as well.
19 and 49 strand are more appropriate for most jewelry designers for longevity of wear. When you move these wires in your hand you really feel the difference in flexibility from the 7 strand.
Diameter & Bead Weight - How do I Choose the Right Size?
We always recommend using the heaviest thickness wire that will go through the smallest hole bead of your project -- and only go through your beads once. You may have trouble finding heavy enough wire if you're mixing tiny seed beads with large and heavy semi precious stone, so be aware of the hole size and weight of your beads and be prepared to design accordingly. .018 diameter is considered the mid-size, all purpose diameter for most projects.
For Beadalon wire, the smaller the number the thinner the wire. .010", .012" and .013" are often appropriate for pearls, seed beads and other fine hole items. .015" is our light medium weight, and can often string slightly larger pearls and small to medium semi precious stone or glass. .018" is the medium diameter and appropriate for most projects with semi precious stone or glass beads.
The large diameters .021, .024 and finally .030 and over are for heavy weight, larger hole beads.
.018 diameter is considered the mid-size, all purpose diameter for most projects.
Finishing Your Project - Crimp Sizes & Guardian Wires
Be sure to use the correct crimp for the beading wire diameter you are using. Beadalon spools will show you the correct size bead or tube to use on the front of the package. Beadalon crimp tubes and crimp beads come in 4 sizes each, and many finishes including gold or silver plate.
For fine jewelry, or to increase longevity of the piece, be sure to use wire guardians to prevent the clasp or other moving metal parts to wear through the nylon and wire.
Crimping 101 - The Basics of Bead Crimping
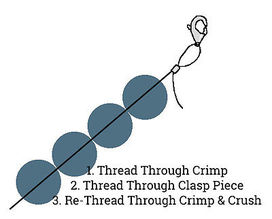
You can work directly on the spool - string beads to about the desired length, leaving about 1.5" planned space in the total necklace length for the clasp and crimp area. After all beads are on, string on the crimp, then the clasp or end ring the clasp will attach to, then thread the wire back through the crimp. Adjust so the loop isn't too large, and crush the crimp to firmly close the loop.
To crush correctly, use crimp pliers. Crimp first using the second notched cup on the plier and firmly crush the crimp. Then rotate the crimp (now sort of crescent shaped) into the first (non-notched) cup, and gently crush into a rounded shape. You may gently rotate and crush the crimp in this first cup to get a nice rounded finish on the crimp, but DO NOT OVERWORK THE CRIMP. This will weaken the metal crimp or cut through the wire and break the jewelry.
Trim the excess wire, and slide your beads against the finished crimped end. Cut your wire from the spool with 3-5" extra wire at the end to thread the other crimp, then second clasp part, onto the wire. Once the wire is back through the crimp with the clasp on it, you will need to pull on the end to pull the crimp/clasp snug against the beads. Again firmly crush the crimp and trim the excess. You're done!
